How To Install Multiple Bootable Operating Systems on One USB Stick
A bootable USB flash drive comes handy when if you have problems with your operating system, mostly when you are facing the dreaded Blue Screen of Death screen again and again. The option of having a bootable version of your operating system helps you to isolate the software issues with your PC/laptop. Further, almost all operating systems make it very easy to put ISO files on portable flash drives by using various tools. For example, the Windows USB/DVD tool and the Startup Disk Creator in Ubuntu.
While having a USB pen drive with a single operating system may come in handy if you are a non-technical person, there are many of us out there who need multiple instances of operating systems to test various software. With so many OS available in the market, it is not worthwhile to keep a separate USB pen drive for each and every one of them. It would be great if you put all the ISO files on one flash drive and take the advantage of installing multiple operating systems through a single multiboot USB flash drive.
So, in this article, we are going to take a look at how you can put multiple ISO files on a single USB stick and create a multiboot USB pendrive. Since most ISOs are resource heavy, your flash drive must but of at least 16GB or 32GB capacity. For instance, putting three Windows ISOs in the multiboot USB disk, you will need a 16GB flash drive.
At the heart of installing multiple ISO files on your USB stick lies a popular tool called WinSetupFromUSB. This tool allows you put multiple ISOs in one installation disk. You can put Windows and Linux in a same bootable disk or create a master boot drive with Windows 7, Windows 8.1, and Windows 10 operating system.
Now let us get down to the business of installing multiple ISO files of different operating systems on a single USB pen drive.
How to install an ISO file of any operating system on a USB stick
- Download WinSetupFromUSB and extract the software on your PC/laptop.
- Connect your USB stick to your PC/laptop.
- Open WinSetupFromUSB. Open the 32-bit and 64-bit version according to your OS.
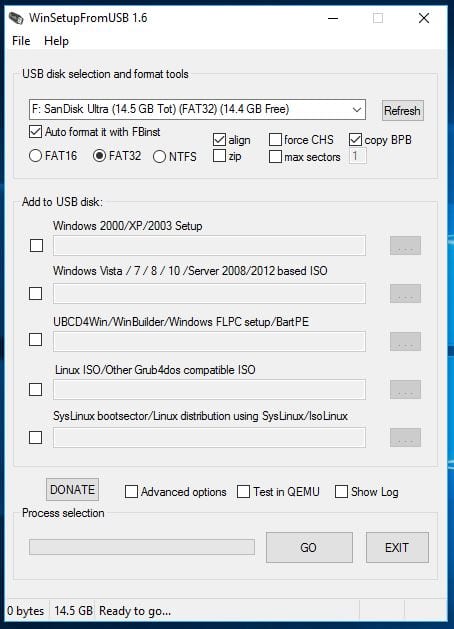
- Select your USB stick from the drop down menu. If the software doesn’t recognise your pen drive, press refresh.
- Tick Auto format it with FBinst. Remember you have to choose this option only during the first ISO installation.

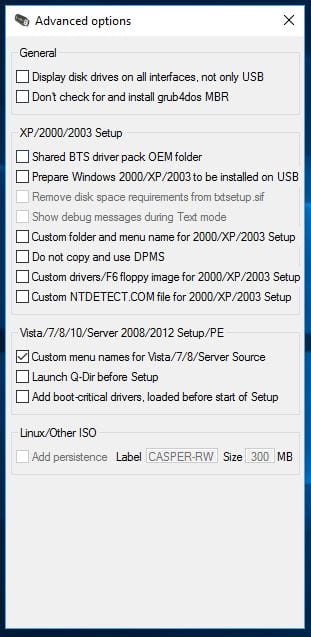
- Now click on Advanced options and select Custom menu names for Vista/7/8/Server Source checkbox. Click the Cross (X) button to exit Advanced Options.

- Now come back to the main screen of the App and select the checkbox of the OS you want to install on your USB stick. Note: If the size of your ISO is larger than 4 Gb, it will show a message to split the file into parts. This is because you’ve chosen the FAT32 option. Click OK.
- Press GO. That’s it. The software will now format your pen drive and install the ISO that you have selected.
How to install second bootable ISO file of any operating system on that same USB pen drive
- Start the WinSetupFromUSB tool again.
- Select your flash drive in the drop down menu.
- Click Advanced Options and look for Custom menu names for Vista/7/8/10/Server Source.
- During second ISO installation, kindly uncheck Auto format with FBinst. Enabling this will remove your previous ISO file.
- Add the ISO file.
- Click GO and follow the same process.
- Follow the same process to add more ISO files.
This method will help you create a multiboot USB flash drive which allows you to choose between multiple operating systems you desire. Remember there are many tools you can use to create such multiboot USB drives. Check out the video below to create a multiboot USB stick using Xboot Windows Tool.

No comments:
Post a Comment